


Log
//use logd shortcut
//use this to debug code
Log.d("main","error")
//print exception in logs
try {
            val a = 5/0;
        }
        catch (e : Exception) {
            Log.e("main","zero error",e)
        }
//use class name for logs
var TAG = MainActivity::class.java.name
Log.d(TAG, "Button clicked!")
Intent
used for communication within activities either inside the same app or within diff apps.
Explicit
- we know the destination class name.
Implicit
- we don't know the destination.
//explicit intent
val intent = Intent(this, SecondActivity::class.java)
startActivity(intent)

//implicit intent
//open map
 var addressUri: Uri = Uri.parse("geo:0,0?q=" + loc)
        var intent : Intent = Intent(Intent.ACTION_VIEW, addressUri)
        try {
            startActivity(intent)
        }
        catch (e:Exception) {
            Log.d("ImplicitIntents", "Cant handle openLocation:")
        }
//open website
var url : String = mWebsiteEditText.text.toString()
        var webpage : Uri = Uri.parse(url)
        var intent : Intent = Intent(Intent.ACTION_VIEW, webpage)
        try {
            startActivity(intent)
        }
Intent-filter
In implicit intent, we don't know the destination of intent. So any activity which wants to receive implicit intent can use intent-filter in the manifest file to receive implicit intents. the android system finds the available activity with a matching filter and displays it to the user. If there is only one matching activity it is handled by default. If there is more than one matching activity, the user is given an option to choose, which activity or app he wants to use. Intent-filter basically acts as a filter for implicit intents on what kind of implicit intent it can receive. Users can create a custom receiver for implicit intents using intent-filter instead of using default system activities.
//receiving activity
<intent-filter>
                <action android:name="android.intent.action.VIEW" />
                <category android:name="android.intent.category.DEFAULT" />
                <category android:name="android.intent.category.BROWSABLE" />
                 <data android:scheme="https" android:host="developer.android.com"/>
            </intent-filter>
//by default intent data is of URI type
var intent : Intent = getIntent()
        var uri: Uri? = intent.data

        if (uri!=null) {
            var uri_string : String = getString(R.string.uri_label) + uri.toString()
            var textView : TextView = findViewById(R.id.text_uri_message)
            textView.setText(uri_string)
        }
pass data with the intent
//main
val intent = Intent(this, SecondActivity::class.java)
        var message = mMessageEditText.text.toString()
        intent.putExtra(EXTRA_MESSAGE, message)
        startActivity(intent)
//secondactivity
var message = intent.getStringExtra(MainActivity().EXTRA_MESSAGE)
save the state of activity
- we can use ViewModel or savedInstanceState to save the state of activity if it is changed due to rotation or due to transition to another activity.
- ViewModel is the easiest way to do this.
- we can store the visibility of the view or text of the view in savedInstanceState and retrieve it
//using savedInstanceState
 override fun onSaveInstanceState(outState: Bundle) {
        super.onSaveInstanceState(outState)
        if(mReplyHeadTextView.visibility == View.VISIBLE) {
            outState.putBoolean("reply_visible", true);
            outState.putString("reply_text",mReplyTextView.text.toString())
        }
    }
onCreate {
if(savedInstanceState!=null) {
            var isVisible : Boolean = savedInstanceState.getBoolean("reply_visible")
            if(isVisible) {
                mReplyHeadTextView.isVisible = true
                mReplyTextView.setText(savedInstanceState.getString("reply_text"))
                mReplyTextView.isVisible = true
            }
        }
}
Debugger
we can use this to debug our app. we can use breakpoints to debug the app.
breakpoint
- A breakpoint is a place in your code where you want to pause the normal execution of your app to perform other actions.
- breakpoint appears as a red dot and we can add or remove it by clicking on the left side of the editor.
- The red dot includes a checkmark if the app is already running in debug mode.
- you can mute a breakpoint by right click -> unchecking the enabled option. It will appear as a blank circle with a border in red. It is best practice because in this condition or other parameters of breakpoint will not get deleted. if you remove the breakpoint all values will be gone.
- you can add a condition to the breakpoint by right click -> check condition -> enter condition. It can be any expression but its result should be boolean. It will only break when that specific condition is satisfied otherwise it will ignore the break.
- developer can run the app in debug mode to enable the debugger.
for running app you can attach the debugger by run -> attach debugger to android process
Frames
The execution stack shows each class and method that have been called in your app and in the Android runtime, with the most recent method at the top.
- you can see the most recent method call at top of the stack and the least recent method call at bottom of the stack. It will show the order of calling of methods clearly through the stack and you can revisit old methods.
Watches
- which shows the values for any variable watches you have set. Watches allow you to keep track of a specific variable in your program, and see how that variable changes as your program runs.
- just add your variable to watches using the "+" icon and enjoy. Now you see how the value of that variables changes for the whole duration of the app.
Variables
- Shows the variables in the current scope and their values. At this stage of your app's execution, the available variables are this (for the Activity), operator (the operator name from Calculator. Operator that the method was called from), as well as the global variables for the EditText elements and the TextView. Each variable in this pane has an expand icon to expand the list of object properties for the variable. Try expanding a variable to explore its properties.
- take the example of "this" variable for the main activity when you expand it you can see all the variables and objects with their values for the main activity.
step over
- use this to move to the next line of execution after the breakpoint.
step into
- use this to dive deep into the method
step out
- use this to step out of the method
run to cursor
- use this to jump to the next breakpoint
Set Value
- you can right-click any variable then use set value.
- It is used to assign values to variables dynamically. It will only affect results in the logs. the UI values or their results will not get affected.
- It is useful to see the change in result by changing the values dynamically.
Evaluate Expression
- you can right-click any variable then use Evaluate Expression.
- we can use this to see the state of any variables or objects in the log
- It is a very useful method if you use it properly
- it will tell the current value of a variable, object, or expression. Just enter the values and click evaluate to see the result in the result box.
- you will not be able to access variables inside it which is not declared yet in the app.
Resume
- green play icon
- when you use breakpoint. It will stop the app at that particular point and now you cannot interact with the app directly and only through the debugger.
- use this to resume the normal running of the app after breakpoint
- the app will again stop when another breakpoint is triggered.
View Breakpoint
- double red dots icon
- use this to see all the breakpoints of the app
- you can edit all the breakpoints through this
Mute Breakpoint
- red dot with cross icon
- it will mute or unmute all the breakpoints of the app.
Stop app
- a square red icon
- use this to stop the debugger
Unit Test
- It is used to test business logic
- the test file is present in the test folder like the folder for all your codes.
@Test
    fun addTwoNumbersNegative() {
        var mCalculator: Calculator? = Calculator()
        var resultAdd : Double? = mCalculator?.add(-1.0,2.0)
        assertEquals(1.0,resultAdd)
    }

 @Test
    fun addition_isCorrect() {
        assertEquals(4, 2 + 2)
    }
- it is very easy to use, you can write your test function with the "@Test" annotation
- everything will be like a normal func, you have to create objects to perform the operation
- in assertEquals methods, the first parameter is the expected value and the second one is an actual value.
- both these values should match otherwise your unit test will fail
- It is considered best practice to have one assertion per unit test because in multiple if one assertion fails then the whole unit test will fail and it will be difficult to debug.
- you can create a test file and method automatically by right click -> class -> selecting methods.
- It will create a test file with the class name and skeleton of the unit tests for the selected methods.
//MainActivityTest
@Test
    fun onAdd() {
    }

    @Test
    fun onSub() {
    }
minSdkVersion
- The minimum version is the oldest Android API version your app runs under.
compileSdkVersion
- ref compilesdkversion-and-targetsdkversion
- The compileSdkVersion is the version of the API the app is compiled against. This means you can use Android API features included in that version of the API (as well as all previous versions, obviously). If you try and use API 16 features but set compileSdkVersion to 15, you will get a compilation error. If you set compileSdkVersion to 16 you can still run the app on an API 15 device as long as your app's execution paths do not attempt to invoke any APIs specific to API 16.
targetSdkVersion
- The targetSdkVersion has nothing to do with how your app is compiled or what APIs you can utilize. The targetSdkVersion is supposed to indicate that you have tested your app on (presumably up to and including) the version you specify. This is more like a certification or sign-off you are giving the Android OS as a hint to how it should handle your app in terms of OS features.
- For example, setting this value to "11" or higher allows the system to apply a new default theme (Holo) to your app when running on Android 3.0 or higher...
- Note targetSdkVersion <= compileSdkVersion
understand importance of minSdkVersion & compileSdkVersion with eg
//compileSdk 31
//minSdk 16
var colorRes = if (Build.VERSION.SDK_INT >= Build.VERSION_CODES.M) {
            resources.getColor(colorResourceName, this.theme)
        } else {
            ContextCompat.getColor(this, colorResourceName)
        }
- If you point at getColor(), Android Studio reports: "Call requires API 23 (current min is 15)". Because your minSdkVersion is 15, you get this message if you try to use any APIs that were introduced after API 15. You can still compile your app, but because this version of getColor() is not available on devices prior to API 23, your app will crash when the user taps the Change Color button.
- At this stage, you could check for the platform version and use the right version of getColor() depending on where the app is running. A better way to support both older and newer Android APIs without warnings is to use one of the compatibility classes in the support library.
- ContextCompat provides many compatibility methods to address API differences in the application context and app resources. The getColor() method in ContextCompat takes two arguments: the current context (here, the Activity instance, this), and the name of the color.
- The implementation of this method in the support library hides the implementation differences in different versions of the API. You can call this method regardless of your compile SDK or minimum SDK versions with no warnings, errors, or crashes.
Random method in kotlin
val randomInt = (1..6).random()
strings.xml
- found inside "src/main/res/values/strings.xml"
- It is best practice not to hard code text in UI views.
- It becomes easier to translate text into different languages. It will use the same strings.xml file and will have different translations.
- Suppose you have a different layout file for landscape mode. Then you don't have to write the text again for different UI views.
<resources>
    <string name="app_name">About Me</string>
    <string name="name">Abhinesh Chandra</string>
</resources>
dimens.xml
- found inside "src/main/res/values/dimens.xml"
- It is useful to store dimensions. benefits are as follows.
- you don't need to write the same dimension again and again.
- you can give meaningful names to dimensions.
- your dimension will be consistent across the app.
<resources>
    <dimen name="text_size">20sp</dimen>
    <dimen name="small_padding">8dp</dimen>
</resources>
fontFamily
- found inside "src/main/res/font/roboto.ttf"
- you can give stylish font to your text using this.
- select view -> select fontfamily -> select more fonts from dropdown from three dots
- select the font you like among several fonts. It will be the same as you see in the word.
- select the type of font like regular, bold etc. then click add font to project.
- then click ok. A .ttf file will be added to the font folder.
- when you open the .ttf file you can see how your font looks.
android:fontFamily="@font/roboto"
styles.xml
- found inside "src/main/res/values/styles.xml"
- you can add all the configurations of your views inside it and give a name to it.
- like for textview you can store all its configurations in a style and use that style for another textview.
- the benefits are as follows.
- the views will be consistent. supposes all the views use the same style for margin and padding configurations.
- you don't need to write the configurations again and again. You can just import style in any UI view.
- click on any UI view -> refactor -> extract style
- give the name of style -> select configurations to keep.
//inside edittext
<EditText
            android:id="@+id/nickname_edit"
            style="@style/NameStyle"
/>

<style name="NameStyle">
        <item name="android:layout_margin">@dimen/layout_margin</item>
        <item name="android:fontFamily">@font/roboto</item>
   </style>
dataBinding
- you can use a binding object to access all the views in the layout
- findViewById takes a lot of time BCS searches the whole view hierarchy.
- in module gradle
android {
buildFeatures {
        dataBinding true
    }
}
- surround your layout with the "layout" tag and add all namespaces to it BCS namespaces are in the outermost tag.
<layout xmlns:android="http://schemas.android.com/apk/res/android"
    xmlns:tools="http://schemas.android.com/tools">
</layout>
- in .kt file
- create a binding var. ActivityMainBinding will automatically be created by databinding and will refer to the main layout.
lateinit var binding : ActivityMainBinding
- replace setContentView
binding = DataBindingUtil.setContentView(this, R.layout.activity_main)
- start using binding var to access views. doneButton will automatically be generated by dataBinding. It will convert id to camelcase and use it.
binding.doneButton.setOnClickListener
data binding to display data
- we need a data class for all the fields we want to display
- we need to declare a variable of type data class
- we will create a new instance of the data class and assign it to variable
- we then populate different fields of the variable.
In UI we need to pass the variable along with the field to display data.
variable declaration just below layout tag.
<data> <variable name="myName" type="com.example.aboutme.MyName" /> </data>- data class declaration
data class MyName (
    var name: String = "",
    var nickname: String = ""
        )
- an instance of data class
private val myName: MyName = MyName()
binding.myName= myName
- populating diff fields of variable
binding.myName?.name = "abhinesh chandra"
myName?.nickname = nicknameEdit.text.toString()
//invalidateAll() is imp to update UI with latest binding object
invalidateAll()
- populating UI
android:text="@={myName.name}"
android:text="@={myName.nickname}"
Add a Fragment
- create a new fragment
- we can choose an existing layout for the fragment or it will create a default one.
- Use the binding object to inflate the fragment class with the layout
- Add the fragment to the layout in which you want to add the supposed main layout, using the fragment tag.
Set the fragment's name to the full path of the Fragment class.
inflating fragment with the layout
override fun onCreateView(
        inflater: LayoutInflater, container: ViewGroup?,
        savedInstanceState: Bundle?
    ): View? {
        val binding = DataBindingUtil.inflate<FragmentTitleBinding>(inflater,
            R.layout.fragment_title, container, false)
        return binding.root
    }
- adding fragments to the main layout file
<fragment
            android:id="@+id/titleFragment"
            android:name="com.example.android.navigation.TitleFragment"
            android:layout_width="match_parent"
            android:layout_height="match_parent" />
Activity and fragment lifecycle
- we use lifecycle methods in android to make our app more efficient. It can free up memory for the resources that are not being used.
- like - suppose there is an activity and fragment which is not being used or assume the app is in the background. In this case, we can free up space used by the fragment or activity.
- you can better understand the lifecycle in android by taking eg - the butterfly lifecycle
- we also use lifecycle methods to change the app behavior based on its states.

- the activity and fragment lifecycle have very similar and basic building blocks.

- Above five states are common in both activity and fragment. Their states behave in the same way too just fragment has a few more states than it and that is BCS it is created on top of the activity.
Activity Lifecycle
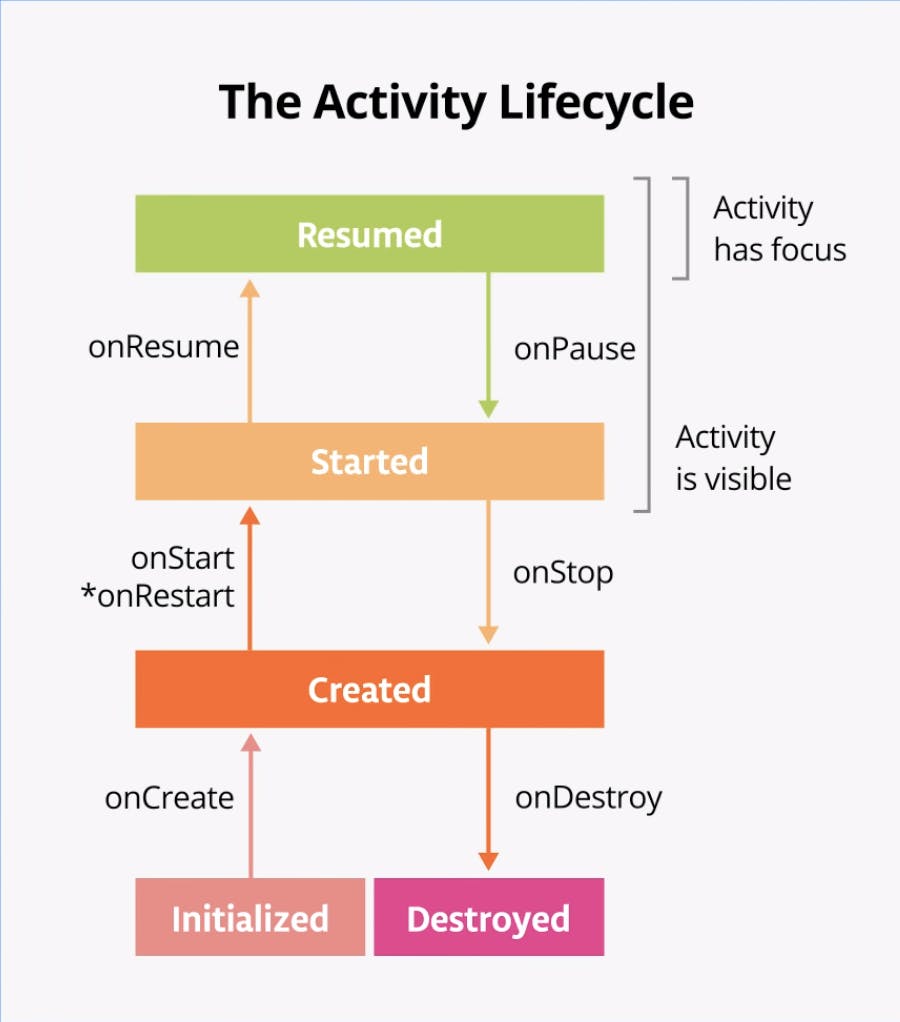
onCreate
- When activity is called for the first time. Then onCreate is called to create the activity.
- After this method activity is created in the memory
- this method is called once during the whole duration of the app for the particular activity.
this method is also called when the user uses the finish(); method to destroy an activity or for some reason when the onDestroy() method is called for the activity.
onStart
- this method is called just after onCreate
- It is used to start the activity after the activity is created
- After this method activity moves to started state and becomes visible to the user.
- User can still not interact with the activity.
- Suppose for some reason activity moves to a stop state then it is called after the onStop and onRestart methods.
Different Activity scenarios
When you launch the app
- onCreate() -> onStart() -> onResume()
- the activity is ready for user intercation